Skip to content

Summarize with
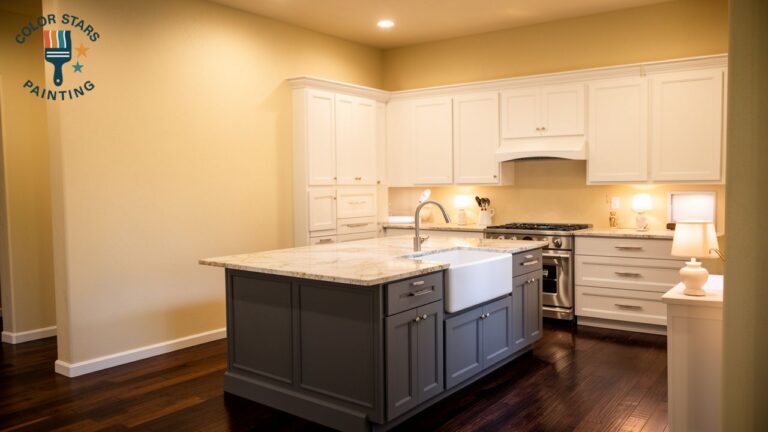
Painting kitchen cabinets involves a systematic process of cleaning, sanding, priming, and applying specialized finishes to update the appearance of a kitchen. This method provides a cost-effective alternative to full replacement and delivers professional results when executed with patience and the correct materials. Success depends largely on the preparation phase, which ensures the paint adheres to the surface and resists the daily wear of a high-traffic kitchen.
This guide provides the technical steps and professional methods required for a kitchen cabinet service makeover. Color Stars Painting provides this information based on years of field experience to help homeowners understand the labor and techniques necessary for a durable finish. Following these instructions will help you avoid common mistakes like peeling paint or visible brush marks.
Preparation and Workspace Setup
Before starting the painting process, the kitchen must be organized to protect non-painted surfaces. Preparation is the most time-consuming part of any kitchen cabinet painting project, but it determines the longevity of the work. According to data from HomeAdvisor, professional cabinet painting costs significantly less than replacement, but the labor involved in preparation is what ensures the value of the investment.
Begin by removing all cabinet doors and drawer fronts. Use a screwdriver or drill to detach the hinges from the cabinet frames. It is helpful to leave the hinges attached to the doors if they are not being replaced; otherwise, bag and label them specifically for each door.
Labeling and Organization
One common mistake is losing track of which door belongs to which cabinet frame. Assign a number to each door and its corresponding frame. A simple way to do this is by placing a piece of painter’s tape inside the hinge hole of the door and a matching piece of tape inside the cabinet box. This prevents confusion during the reinstallation phase.
Protecting the Kitchen
Cover the countertops, floors, and appliances with protective materials. Use heavy-duty brown paper or plastic sheeting secured with painter’s tape. If the cabinet frames are being painted in place, create a “tent” around the work area using plastic to prevent dust and paint fumes from spreading to the rest of the home.
Surface Cleaning and Degreasing
Kitchen cabinets collect layers of grease, steam, and food residue over time. Paint will not bond to a greasy surface, so thorough cleaning is mandatory. Traditional soap and water are often insufficient for this task.
Use a strong degreaser like Trisodium Phosphate (TSP) or a specialized kitchen cleaner. Scrub every inch of the frames, doors, and drawer fronts. Pay close attention to the areas around the handles where oils from hands accumulate. After scrubbing, wipe the surfaces with a clean, damp cloth to remove any chemical residue. The wood must be completely dry before you move to the next step.
Bonus Tip: Change the cleaning water frequently. Using dirty water just moves the grease around instead of removing it.
Sanding for Adhesion
Sanding creates a “tooth” on the surface, which allows the primer to grip the material. For most kitchen cabinet refinishing projects, a total stripping of the old finish is not required. Instead, a light scuff sanding is effective.
Use 120-grit or 150-grit sandpaper for the initial pass. The goal is to remove the shine from the existing finish, not to reach bare wood. If the cabinets have deep scratches or dents, fill them with a high-quality wood filler before sanding. Once the filler is dry, sand those areas flat.
After sanding, the surfaces will be covered in fine dust. Use a vacuum with a brush attachment to remove the bulk of the debris, then follow up with a tack cloth. A tack cloth is a sticky cheesecloth designed to pick up the smallest dust particles that a vacuum might miss.
Selecting the Right Materials
Choosing the best paint for kitchen cabinets is a decision that affects both the look and the durability of the kitchen. Traditional wall paint is too soft for cabinets and will quickly show signs of wear or sticking.
| Paint Type | Durability | Drying Time | Cleanup | Recommendation |
| Acrylic Latex | Moderate | Fast | Water | Good for low-use areas |
| Alkyd-Hybrid | High | Moderate | Water | Best for most homeowners |
| Oil-Based | Very High | Slow | Mineral Spirits | Professional use only |
A report from Zillow indicates that minor kitchen updates, including cabinet repainting, can provide a high return on investment. Using the right materials ensures that the value remains for years. Most professionals prefer water-based alkyd paints because they level out like oil paint but clean up with water.
Priming the Surfaces
Primer acts as the glue between the cabinet surface and the paint. It also blocks stains and prevents tannins in wood like oak or cherry from bleeding through the paint.
For most cabinet painting services, a shellac-based or high-adhesion oil-based primer is the standard. These primers stick to almost any surface, including laminate and old varnish. Apply the primer in thin, even coats using a high-quality brush or a small foam roller. If the wood has a heavy grain, like oak, the primer will help fill some of those pores.
Once the primer is dry, perform a light sanding with 220-grit sandpaper. This removes any bubbles or brush marks, creating a perfectly smooth base for the topcoat.
Painting the Cabinets
When it is time to apply the paint, the technique is as important as the product. Start with the cabinet frames, then move to the doors and drawers.
Application Methods
If using a brush, select a synthetic bristle brush for water-based paints. Apply the paint in the direction of the wood grain. For a smoother finish, use a microfiber roller on the flat panels.
If the goal is a factory-like finish, a High-Volume Low-Pressure (HVLP) sprayer is the best tool. Spraying requires more masking and preparation but results in a finish without brush or roller marks. Regardless of the method, apply two thin coats rather than one thick coat. Thick coats lead to drips and take longer to cure.
Bonus Tip: Sand lightly between coats of paint with 320-grit sandpaper. This creates a professional, smooth-to-the-touch finish. After the final coat is applied, allow the surfaces to rest completely before starting the reassembly process.
Reassembly and Curing
The final step is the most difficult for many homeowners: waiting. While paint may feel dry to the touch within an hour, it takes much longer to cure. Curing is the process by which the paint reaches its maximum hardness.
Wait at least 24 to 48 hours before reattaching the doors to the frames. Even then, handle the doors gently. According to instructions from Sherwin-Williams, some paints can take up to 30 days to fully cure. Avoid scrubbing the cabinets or using harsh chemicals during this period.
When reassembling, install new bumpers on the corners of the doors. These small felt or rubber dots prevent the painted surfaces from sticking to each other when the doors are closed.
Things to Consider Before Making a Decision
Before finalizing your plans for a cabinet repainting project, evaluate the following factors to ensure the best outcome for your home:
- Cabinet Material: Real wood and wood veneer are excellent candidates for painting. Laminate and thermofoil require specialized primers and more intensive preparation.
- Condition of the Wood: If the wood is rotting, warped, or severely cracked, paint will not fix the structural issues. In these cases, replacement or refacing might be better.
- Time Commitment: A standard kitchen takes approximately 30 to 40 hours of labor to paint correctly. Ensure your schedule allows for the kitchen to be out of commission for several days.
- Desired Finish: Decide if the wood grain should be visible. If a smooth finish is desired on oak cabinets, a grain filler must be applied before priming.
Common Questions
Can I paint over stained cabinets? Yes, you can paint over them as long as the surface is cleaned, de-glossed by sanding, and primed with a stain-blocking primer. Without the correct primer, the stain can seep through the new paint.
Is it better to spray or roll cabinets? Spraying provides the smoothest finish but requires significant skill and equipment. Rolling and brushing are more accessible for DIY projects and still produce great results if high-quality tools are used.
How do I clean painted cabinets? Use a soft microfiber cloth and a mild dish soap solution. Avoid abrasive sponges or harsh ammonia-based cleaners, which can dull or damage the paint finish.
How long will painted cabinets last? With professional-grade materials and proper preparation, a cabinet paint job can last 8 to 10 years before needing a touch-up.
Frequently Asked Questions
What is the best temperature for painting cabinets?
The ideal environment is between 60 and 80 degrees Fahrenheit with low humidity. High humidity slows the drying process and can affect the paint’s ability to level out.
Do I need to sand between every coat?
Yes. Light sanding with a high-grit paper removes dust nibs and imperfections that settle on the wet paint. This step is the difference between a DIY look and a professional finish.
Why is my paint peeling off the cabinets?
Peeling is almost always caused by poor preparation. This usually means grease was left on the surface or the previous finish was too glossy for the paint to bond.
Can I paint the hinges?
It is generally recommended to replace or clean the hinges rather than painting them. Paint on hinges will eventually crack and peel due to the constant movement of the metal parts.
Should I paint the inside of the cabinets?
Most homeowners only paint the frames, door fronts, and door backs. Painting the insides is time-consuming and often unnecessary unless the cabinets have glass fronts where the interior is visible.
Summary of Best Practices
Successfully painting kitchen cabinets requires a commitment to the preparation phase. Cleaning with a degreaser, sanding to remove the gloss, and using a high-quality bonding primer are the most important steps. Choosing a paint specifically designed for trim and cabinets will provide the durability needed to withstand daily use. Always allow for adequate drying and curing time before reattaching hardware to prevent damage to the new finish. By evaluating the condition of the cabinetry and your available time before starting, you can ensure the project meets your long-term goals.
Expert Cabinet Painting Results
For homeowners who prefer a professional touch for their kitchen cabinet makeover, Color Stars Painting offers specialized services. Achieving a factory finish requires specific equipment and technical knowledge of various wood types. To discuss a project or receive more information about professional cabinet painters, contact the office at (512) 815-0310 or reach out via email at Servando033087@gmail.com. Experienced teams help ensure the cabinet repainting process is efficient and durable.
Sources
- HomeAdvisor – Detailed breakdown of costs associated with cabinet painting and refinishing.
- Zillow – Information regarding the return on investment for various kitchen renovation projects.
- Sherwin-Williams – Professional guide on the technical steps and curing times for cabinet paints.
- This Old House – A comprehensive look at the tools and materials required for cabinetry painting.